

A deaerator has one primary job: remove dissolved gases—particularly oxygen and carbon dioxide (CO2)—from boiler feedwater before that water enters the boiler system.
But how do you know if your deaerator is actually doing its job?
The most direct way is to test the dissolved oxygen (DO) concentration in the deaerated water leaving the equipment. Regular dissolved oxygen testing can help boiler operators verify deaerator performance, identify operating problems, and detect conditions that contribute to corrosion in the boiler and feedwater system.
Why Dissolved Oxygen Matters
Oxygen dissolved in boiler feedwater can accelerate the corrosion of carbon steel and other components in the boiler and throughout the boiler system. Mechanical deaeration is therefore a critical component of effective boiler water treatment.
A properly operating deaerator should reduce dissolved oxygen down to 0.005 cc/L (7 ppb) and CO2 down to 0.
Read our related article: Why Do Steam Systems Need a Deaerator?
Where Should You Take the Sample?
The sample should be taken directly from the deaerator storage tank near the pump suction connection (not from external piping).
The sampling arrangement is critical to getting an accurate result. A good dissolved oxygen sampling system should:
- Provide a representative sample of deaerated water
- Minimize exposure to atmospheric air
- Allow the sample line to be flushed before testing
- Control sample temperature as necessary
- Avoid leaks that could draw air into the sample
- Provide a consistent flow rate
- Be located where the sample reflects actual deaerator performance
If possible, the sample should be taken from a dedicated sample connection designed specifically for boiler feedwater testing.
Proper Sample Collection: The Most Critical Step
Dissolved oxygen measurements are extremely sensitive to sampling technique.
Consider a deaerator operating with very low dissolved oxygen. If atmospheric air enters the sample during collection, the measured oxygen concentration will be significantly higher than the actual concentration inside the deaerator.
For this reason, the sampling line should be flushed thoroughly before taking a measurement.
Step-by-Step Sampling Procedure
1. Establish Steady-State Operation
Ensure the deaerator has been running for at least 3 to 4 hours at steady-state conditions, operating within +/- 2F of target pressure and temperature. If starting from a cold startup, test the deaerator only after it has been under actual boiler load for at least a full day to allow complete turnover of the un-deaerated water.
2. Open the Sample Valve
Initiate flow of deaerated feedwater through the sample line, following manufacturer recommendations for flow rate and temperature.
3. Flush the Sample Line
Allow sufficient water to flush through the line to clear stagnant water and establish a fresh, representative sample directly from the deaerator.
4. Cool the Sample Temperature
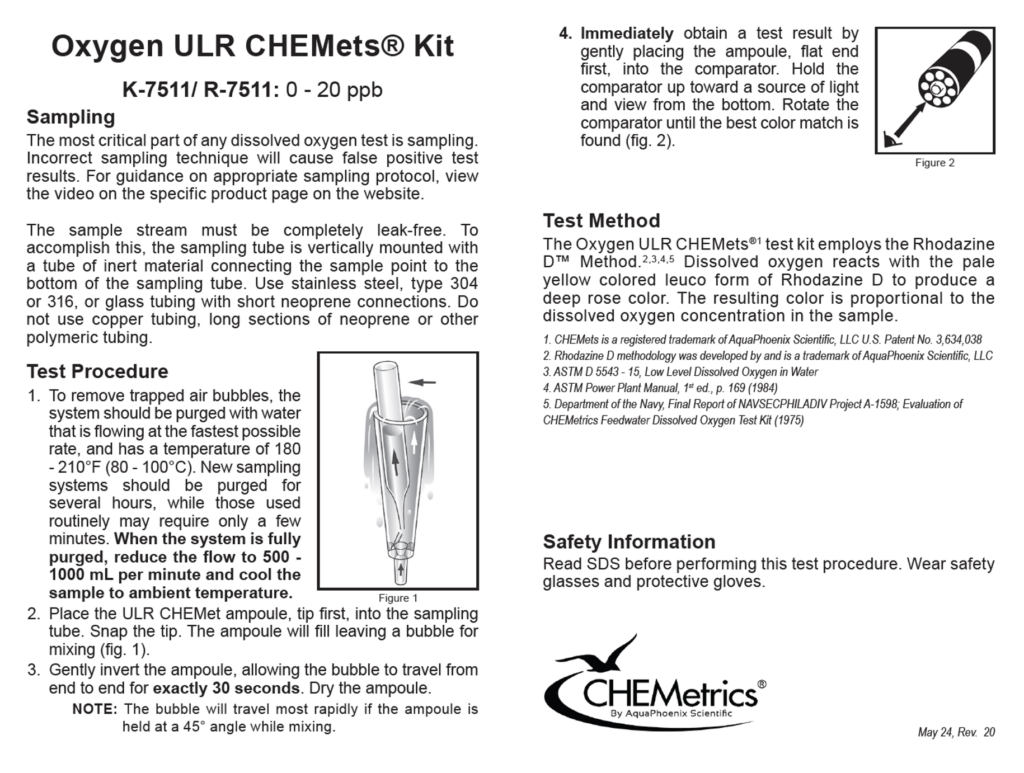
Deaerator water is hot and must be cooled before entering test equipment. For the CHEMetrics ULR K-7511 dissolved oxygen test kit, cool the sample to below ambient temperature prior to testing.
5. Prevent Air Contamination
This is critical. Never collect the sample in an open container to transfer to a lab or testing equipment. Exposure to atmospheric air can change the dissolved oxygen concentration. Introduce the sample directly into the testing apparatus or use a closed sampling method designed to prevent oxygen exposure.
6. Perform the Dissolved Oxygen Test
Run 3 to 5 ampoules over a 30- 60-minute window while operating under steady state. (If needed, create a load artificially by draining the tank.) Follow the standard CHEMetrics K-7511 testing instructions or view their official walkthrough video on YouTube.
What If the Dissolved Oxygen Level Is Higher Than Expected?
An unexpectedly high dissolved oxygen reading does not necessarily mean the deaerator has failed, false highs are extremely common when measuring at such low oxygen levels. While you can easily get a false high, it is impossible to get a false low measurement. Always take 3 to 5 measurements and record the lowest value observed.
If high DO readings persist, troubleshoot the following areas:
1. Check the Sampling Procedure
Verify that air was not introduced during sampling. Inspect for:
- Loose fittings or leaking sample tubing
- Poor sample connections or open containers
- Excessive sample turbulence or inadequate flushing
- Improper sample temperature
2. Verify Deaerator Operating Conditions
Review core operational variables:
- Operating pressure and temperature
- Steam supply, water level, and feedwater flow
- Makeup water flow and condensate return rate
- Vent operations
- Proper piping of all water inlet flows to designated connections
3. Inspect the Deaerator Vent
The vent provides a controlled exit path for non-condensable gases removed from the feedwater. If the vent is improperly adjusted, restricted, or blocked, deaeration performance will suffer.
Read our guide: Deaerator Venting: Troubleshooting & Calculating Vent Rates
4. Evaluate Changing Load Conditions
Deaerator dynamics shift across low, normal, and peak loads. If DO levels correlate with boiler demand, compare measurements against boiler load, feedwater flow, makeup percentage, condensate return, pressure, and temperature to determine if the variance is operational rather than mechanical.
How Often Should You Test Dissolved Oxygen?
Testing frequency depends on your boiler system size and water treatment protocol:
- New Installations: Test frequently during startup and commissioning to establish a performance baseline.
- Operating Plant: Establish a set schedule within your plant’s regular boiler-maintenance and water-treatment program.
Best Practice: Always log dissolved oxygen alongside operating conditions (pressure, temperature, load) at the time of the test. Building a historical baseline allows operators to detect gradual increases in DO early and troubleshoot effectively.
Final Takeaway
Testing dissolved oxygen is one of the best ways to verify that your deaerator is effectively removing oxygen from boiler feedwater. For reliable, repeatable results:
1. Sample directly from an appropriate deaerated feedwater location.
2. Flush the line thoroughly before testing.
3. Prevent atmospheric air exposure.
4. Cool the sample below ambient temperature.
5. Use a CHEMetrics K-7511 test kit.
6. Conduct 3 to 5 tests over a 30-60 minute period and record the results along with deaerator operating conditions.
7. Trend results over time rather than relying on a single measurement.
Need Help Evaluating Your Deaerator?
If your dissolved oxygen readings remain elevated, the issue may stem from operating conditions, venting, steam supply, feedwater flow, sampling or the deaerator itself. Contact the experts at BFS Industries to evaluate your system and ensure your equipment operates at peak efficiency.